
I had been looking to build some more bottle storage as the existing 186 bottle rack was overflowing. I knew I had to bottle about 50 gallons (250 bottles) soon, so I had to get going on building the racks. My previous rack was made from oak and it cost me about $1 a bottle just for the materials. Since I planned on making a 300 bottle rack, I didn’t want to break the bank in building it. I used oak on the previous rack since it is “suspended” and the bottles sit on the horizontal rack. I wanted to minimize the deflection over time, so I chose oak as opposed to pine. This has worked very well and I have no complaints, other than the cost.
Luckily, Steve Hughes had an article in WineMaker Magazine that had plans for building vertical ladder racks. However, if I used preplaned 1x stock, it would have cost me about $1 a bottle to build. This is because of all of the lumber required to build these. Instead, I decided to only buy 1x for the rungs and then use 2x4’s ripped to get the 1.5” pieces. This would save me about $100 on the cost. I also bought the most economical 1x at Lowe’s. This maybe had some knots, but when cutting around 300 ¾” pieces 9” long, I could afford to toss a couple if a knot broke the piece.
The first step was to calculate how many materials I needed. My area was only 7 feet high and 8 feet long. (The article has a nice explanation on calculating the materials). I therefore only needed to make 23 ladders. This meant 46 pieces of ¾” x 1 ½” to rip from the 2x4’s. I could get 4 per board, so I bought 12 boards. I needed 308 rungs, and I could get 9 rungs from each length(since they were 10 3/8” long), so I needed 34 lengths of ¾” wide 1x. Taking into account all of the loss from the kerfs, I figured to buy 1x6, and cut it into 6 strips, so I would need 6 boards. I headed out to Lowe’s with my list and picked everything up for $100. The pine boards were $10 apiece, and the 2x4’s were $3.
The article also describes building the jig to facilitate building the 24 ladders I needed. Since my space only allowed for a 76” ladder, I built it slightly smaller than the article. I had some leftover scrap plywood and lumber I used to build the jig. Essentially, it is the negative skeleton for the ladder, allowing you to drop everything in and then nail it in place without having to do too much work. With this in mind, everything has to be exactly correct, otherwise your racks will have problems. There is a front guide, a bottom guide, and then the guides for each rung. The bottom and side are easy, just place the 1x against the edge and screw in place. The rung guides are not so easy since there are so many of them. The key here was to pre-drill the holes in the blocks to ensure they do not split. Also, you’ll need 2 ½” screws to go through them into the plywood. This process was very tedious, as you really need to make sure every piece is correct. I had to place in 30 blocks, so it is a bit time consuming.
Once the jig was complete, I had to cut all of the lumber. I was going to make 23 ladders, so that meant I needed 46 1x2”s for the upright supports. This meant I had to rip all of these from the 2x4. Needless to say, there was quite a bit of sawdust but I was able to make 4 pieces out of 1 2x4. 13 2x4”s at $3 a piece is a lot cheaper than the 1x. I then had to rip all of the rungs. For this, I did buy the 1x, since it made more sense because these were 1”x1” (or ¾” x ¾”). This way, I didn’t have to cut it twice. After I reppied all of these to the correct width, I then set up a stop on my miter saw at the exact length I needed and that way I did not have to measure each one of the approx. 300 cuts. I cut a few extra than I needed because I knew some would be no good. I now had the jig and all the pieces to start assembling the ladders.
The first step is to make the left side of the rack. Since on the left side, the rungs will be facing in, you simply drop the upright supports into the jig (making sure they are up against the guides) and then place the rungs into the jig on top of the upright supports. The rungs fit within all of the blocks you had placed before. Then, I took my finish nail gun and nailed them each twice with 1” brads. I then simply lifted the assembled ladder out of the jig and set it aside. Then, you have to make all of the interior ladders. The only difference is that rungs will be on both sides, so you have to place rungs in the jig, then the upright supports, then another set of rungs. After doing this, I switched the nail gun to 2” brads and shot one nail through to assemble everything. I then lifted this out and repeated it for all of the interior racks. The final step was to make the right side ladder. This entailed putting the rungs in first, and then the upright supports, and nailing them together with 1” brads.
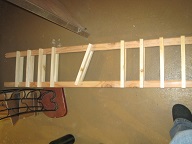
Now that I had all of the ladders built, I had to put them together to actually hold the bottles. I ripped three pieces of 1 x2 to make horizontal supports. I then laid down all of the ladders in the order needed and placed the supports required for the back on top of the ladders. I then spaced each of the ladders as I nailed them to the back supports.
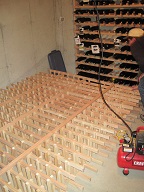
Then, I lifted up the rack and placed the front supports in place (measuring for width again). Finally, I used some of the leftover 1 x 2 to attach the rack to the joists in the ceiling above. I did this because we do occasionally have small earthquakes in our region and it adds a small layer of protection.
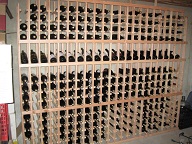
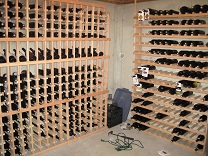
Once it was finally done, I placed all of my wine in the racks. The display row makes it easy for me to see exactly what is in that column in the rack without having to resort to bottle tags. The only regret I have is that it won’t accept magnums. The spots are too small, so I have to put those in my other racks. In hindsight, I would have created a final ladder that would accommodate these larger formats.
And a video on the two types of racks I have: