For other rabbit articles, click here
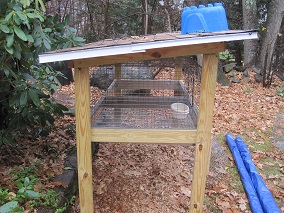
This rabbit hutch is adapted from a common set of plans in the Barnyard in your Backyard book. The key goals of this rabbit hutch would be cleanliness and durability. The cleanliness would be achieved by the use of all wire cages while the durability would be accomplished by using pressure treated wood. The only tricky part was to isolate the wood from the rabbit’s mouths. I accomplished this by using aluminum flashing over the areas where the rabbit would come in contact with the wood. I have found that these hutches are very durable and look nice as well.
The first step is to get the materials. The list is as follows:
9 pieces of PT 2x4x96
1 12” x 12” piece of ½” plywood (PT)
23 ft of 6” aluminum flashing
1 sheet of 4x8 plywood (1/2” is fine)
24 feet of drip edge
32 sq ft of tar paper
1 bundle of shingles + 8 shingles OR 32 sq. ft of roll roofing
2.5” outdoor screws
Roofing nails
16 right angle brackets (mid gauge)
1 5/8” exterior screws
1 roof joist bracket
Tools
Drill (with drill bit and screw bit)
Hammer OR Framing nail gun (for attaching plywood roof) AND Roofing nail gun
Square
Level (4 ft)
Staple gun (for tar paper)
Circular saw OR Chop Saw
Reciprocating Saw
The first step is to make the box. I am making this for two 36” (w) x 30” (d) cages This involves cutting two 2x4’s at 75, and 3 more 2 x4’s at 34, 34, and 31. Make a box on the floor, with the two pieces of 34” wood on the outside edge of the 74.5 pieces. Screw the ends together, making sure it is square. Then, measure 36 ¾” from the end of each long board and place the 31” piece in the middle. Then, screw this piece into place. This box serves as the area on which the cages will be. It is helpful to do this on a level surface, I used my garage floor.
The next step is to cut 2 2/4”s at 60” apiece and 2 at 56”. These are for the legs. It is noted that this will have a very slight pitch. If you want a higher pitch, then make that at this time. I have found that this small pitch creates a good overhang protection. If it is too steep, it tends to let a lot of wind and rain in the front. Lift up the box made in the previous step and lay it lengthwise (so it is sticking up in the air 34”). Make a mark at 32” on each of the legs, this will be the attachment location of the legs to the frame. Screw one of the 60” legs onto the frame, making sure the 32” mark is level with the bottom of the frame. This will be the front of the hutch. Repeat on the other side, making sure to use the 56” leg. (This allows you to leave it on the ground, while attaching these two pieces). The next step is to lift and position the frame so you can put the next set of legs on. A second person can help as you’ll have to find a way to keep the frame level with those legs. (I use a ladder and simply prop it on a rung). Once you are done attaching the legs, carefully lift it up to standing.
Now that the frame and legs are done, the roof frame is next. Cut two pieces of 2x4 at 78”. Then, attach these pieces on the front and back of the top section. Place the back one about ¾” below the top part of the board, as we’ll angle the roof, so we have to cut that leg at an angle). The one on the front can be flush with the top of the board. Now, take some 34” pieces and attach them to the sides of the roof frame. Don’t be too concerned with the exact fit. Make sure that the back is flush with the front edge of the leg (once again, that angle needs to be cut). Once it is attached, I take a circular saw and cut to flush with the legs. The final step to the roof frame is a center joist. I cut it to the appropriate angle, and attach with a roof joist hangar. Now, I take a reciprocating saw and cut the angle on the legs. To complete the entire frame, cut two 12” x12” triangles. Make sure the frame is level and screw these triangles to the front legs and top of the frame. These act as “anti-racking” supports. Do this on both front sides. Optionally, these can be added to the back for added stability, but I have not found them to be needed.
At this point, I move the frame to where it will end up. It is easy to carry, so I bring it to where I want and level it out. Once the roof and shingles go on, it will be a lot heavier. Once I have it in place, I take a full sheet (4’x 8’) of plywood and place it over the frame. Make sure it is square to the frame and make the overhangs how you want them. I prefer more in front, so I can get some protection of the feed bowls from rain. Once the plywood is place, I nail in the plywood to the roof frame. The next step is to add the drip edge. This is optional, but it will extend the life of the plywood. I simply cut the length I need and attach. I then roll out tar paper and staple down. The next step can use either regular roofing shingles or roll roofing. Technically, the pitch is 4/4, so roll roofing is required. I prefer shingles because they look better. Either way, attach the shingles or roll roofing to the plywood. (If you have never roofed before, please look into how to lay the first course). Once done with this, your work continues under the roof.
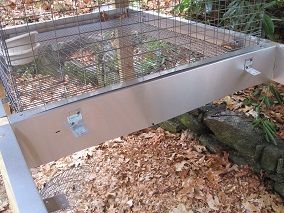
To stop the rabbits from chewing the PT wood, add flashing to the frame (only where the rabbits are, not the roof). Measure the length of each section of the frame and cut the flashing to length. Then, measure 1” from one side and bend a 90 degree angle. I have an aluminum brake, so this makes it very simple. Once all of the pieces are cut, I lay the bent piece over the frame and let the 5” remaining hang down. This hangs lower than the wood so it ensure everything drips down and does not wick back up. Finally, I add the brackets to the frame to hold the cages in place. Previously, I made these flush with the bottom of the frame. This makes opening the door somewhat difficult. So, now I measure 2” from the top of the frame (it would be 3 ½” if all the way flush), and attach the brackets. To do this, make pilot holes with a drill slightly smaller than the screw. Since you are going through the aluminum, this makes it much easier when you actually screw the brackets in. There will be two on each side of the cage, so space them appropriately. Now, you can drop your cages in and attach them to the brackets for extra stability. Keep in mind, though, that you will want to easily remove the cages, so don’t make it too hard to undo.
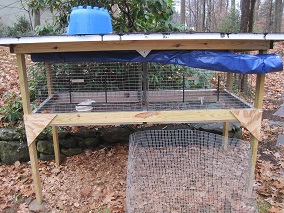
This hutch allows for an easy modification depending on your climate. If you have cold seasons, I have found that you can make an effective wind barrier with this hutch. Simply attach a 1x3 (or strapping) to a tarp on both ends. Then, attach one end to the frame (either on the side or front or back) and let the other hang. Then, add hooks to the side of the frame where the grommets are and pull tight. This makes an effective wind barrier that is removable (not like stapled or nailed plastic), and allows some circulation of air. On warm days in the winter, I simply roll up the tarps to give the rabbits some extra sunshine. Then, once the spring and summer roll around, I take off the tarps completely, hose them off, and store them for next winter.
The best part is the ease of cleaning. Every 4 months, I move the rabbits, remove the cages and scrub down the flashing and cages. The flashing cleans up easily with a rough sponge (soaked in bleach solution). I simply give it some time to dry in the sun and then place the cages back in and the rabbits back in. I find this much better than constantly cleaning out a hutch with all its soiled nooks and crannies.
Hopefully these instructions have provided you some ideas on how to build a rabbit hutch that is functional and affordable. The materials listed are around $100, and the cages usually cost about $35 apiece. I have built two of these kind and they continue to be in use today. I like the portability, adaptability, and ease of cleaning that I get from these hutches. The best part is probably that the rabbits cannot chew them or soil them, so they last a lot longer.